Saturday, May 30, 2009

cuban sandwich


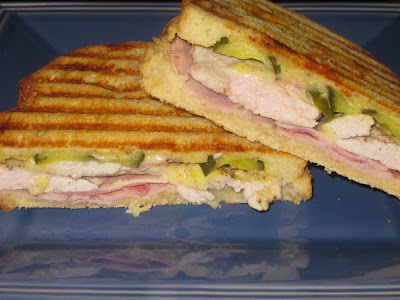
My family is now panini-obsessed. We have been doing slight variations on the chicken-pesto-mozzarella combo, so I decided to change it up a little bit, with a pressed Cuban sandwich. I included all the classical components: ham, pork, Swiss, pickles, and mustard.

Friday, May 29, 2009

pasta alla carbonara


Looking for a quick, easy, and comforting dinner? I would recommend Pasta alla Carbonara. The meal requires minimal ingredients, can be prepared in no time, and is always a crowd-pleaser. My family keeps bacon in the freezer solely to accommodate this dish. We like it with lots of freshly ground black pepper.

Pasta alla Carbonara
Adapted from Gourmet, March 2003

8 oz. bacon, chopped
1 medium onion, chopped
1/4 c. white wine
3 eggs
1/2 c. grated Parmigiano Reggiano or Pecorino Romano
1 lb. spaghetti

Cook spaghetti in boiling salted water, reserving 1/2 c. pasta water. Beat eggs in a dish, and add in cheese. Set aside.

Crisp bacon in a hot pan. Remove bacon, and set aside. Saute onion in bacon fat until tender. Add white wine to pan, and let simmer for two minutes. Remove from heat. Add spaghetti and pasta water to pan. Pour in egg-cheese mixture, and toss to coat pasta. Season with salt and pepper.

Friday, May 22, 2009

sesame red bean paste ball


Today, I went for a trip with my sisters, mom, and grandmother to King Fung Food Market (625 Kinderkamack Rd, River Edge, NJ 07661), our favorite local Chinese grocery store. It’s always a treat when we go, mostly because we always get a few of their Red Bean Sesame Balls. Red bean paste is surrounded by glutinous rice flour dough, covered in sesame seeds, and fried until puffed and golden. They are sweet, nutty, slightly crispy on the outside and chewy throughout, and just delicious.

Sunday, May 17, 2009

sugar cookies


My high school cafeteria used to sell sugar cookies that made me and all my friends swoon. They were just as sugar cookies should be: soft and chewy, with a glistening, cracked top. I had never tried to replicate them in all these years, but, when I saw a recipe on marthastewart.com that looked promising, I couldn’t help myself.

I made a few minor adjustments to the recipe, including the substitution of half of the all-purpose flour with bread flour, to increase the cookie’s chewiness. Before being baked, the cookies received a double-coating of sugar, which accounts for its crisp, sweet exterior. The recipe also stated that they should be flattened slightly. (I flattened the cookies prior to baking, as the recipe suggests, and the cookies turned out fairly thin. Next time, I plan on baking at least a few cookies without flattening them, to see if it results in a thicker cookie. I will update, in any case.)

Right from the oven, the cookies were both soft and chewy. A few hours later, they lost some of their softness, but retained a good deal of their chewiness. If ultimate softness is desired, I recommend placing the cooled cookies in an airtight container with a slice of bread; the moisture from the bread will be absorbed by the cookies, and they will regain their straight-from-the-oven softness. Or, you can pop them in the microwave for 10 to 15 seconds to achieve a similar effect.

A warning: These cookies spread a lot when baking. A rounded tablespoon of dough yielded a cookie with a diameter of roughly 3 inches.

Old-Fashioned Sugar Cookies
Adapted from marthastewart.com

1 1/2 c. all-purpose flour
1 1/2 c. bread flour
1 tsp. baking soda
1/4 tsp. salt
1 3/4 c. granulated sugar, plus more for sprinkling
1/4 c. packed light-brown sugar
2 tsp. vanilla
2 sticks butter, room temperature
2 eggs

Preheat oven to 350 degrees.

Sift flours, backing soda, and salt into a bowl. Set aside.

Put sugars and vanilla in the bowl of an electric mixer fitted with the paddle attachment. Mix on medium speed 30 seconds. Add butter; mix until pale and fluffy, about 2 minutes. Mix in eggs, 1 at a time. Reduce speed; gradually add flour mixture, and mix until just combined.

Using a small scoop (about 1 tablespoon), form dough into balls. Roll dough in granulated sugar, and place 2 inches apart on Silpat-lined baking sheets. Flatten cookies slightly with the bottom of a glass. Sprinkle granulated sugar on top of each cookie.

Bake cookies, until light golden, about 10 to 12 minutes. Let cool on sheets on wire rack for 5 minutes. Transfer cookies to racks to cool completely. Cookies can be stored in an airtight container at room temperature up to 3 days.

UPDATE 11/26/09: Just made the sugar cookies with 1 1/2 tbs. of dough, without flattening. The cookies definitely have some added height.

Monday, May 11, 2009

cannoli from veniero's


Veniero's, located in the East Village, on the corner of 11th St and 1st Ave, makes the best cannoli ever.

Sunday, May 10, 2009

scones with strawberry jam and cream


For this year’s Mother’s Day breakfast, I surprised my mom with one of her recent food obsessions: scones. It all started with our trip to Alice’s Tea Cup, from which we walked away with two delectable scones. While the flavor possibilities are essentially endless, I decided to keep it simple, with cream scones.

Now, what’s a scone without jam and cream? My mom and I definitely approve of the combination, so, as the scones baked, I began preparing some homemade strawberry jam and lightly whipped cream. Following a recipe by Ina Garten, I cooked sugar, lemon zest and juice, and strawberries slowly over low to medium heat for a total of around 30 minutes, poured the jam into jars, and put it in the refrigerator to cool. Using a whisk, I whipped some heavy cream to soft peaks. Meanwhile, the baked scones came out of the oven and went onto a rack to cool.

Once cooled and ready to serve, I split open the scones and filled them generously with strawberry jam and cream. The texture of the scone (light, tender, with a fine crumb) was perfectly complemented by the chunky jam and smooth cream. My only complaint about the scones was their general lack of flavor; of course, this problem can be immediately resolved by serving them with jam and cream. Next time, however, I will try adding different flavors to the scone itself, รก la Alice’s Tea Cup.

Cream Scones
From Martha Stewart’s Baking Handbook
Makes 8 to 10

2 c. all-purpose flour, plus more for work surface, hands, and cutter
3 tbs. sugar, plus more for sprinkling
1 tbs. baking powder
1/2 tsp. salt
6 tbs. cold unsalted butter, cut into small pieces
1/3 c. heavy cream, plus more for brushing
2 large eggs, lightly beaten

Preheat oven to 400 degrees. Line a baking sheet with parchment paper; set aside.

Sift flour, baking powder, and salt into a large bowl. Using a pastry blender, cut in butter until largest pieces are the size of small peas. Using a fork, whisk together the cream and eggs in a large glass measuring cup. Make a well in the center of flour mixture, and pour in cream mixture. Stir lightly with form just until the dough comes together.

Turn out dough onto a lightly floured work surface. With floured hands, gently pat dough into a 4 1/2 by 8 1/2-inch rectangle, about 3/4-inch thick. Cut into triangles, and transfer to lined baking sheet. Brush tops with cream and sprinkle with sugar.

Bake scones until golden brown, 16 to 20 minutes. Transfer scones to wire racks, and let cool. Serve warm or at room temperature.

Fresh Strawberry Jam
From Barefoot Contessa on foodnetwork.com
Makes 2 pints

2 c. sugar
1 large lemon, zested and juiced
1 1/2 pints fresh strawberries, hulled and halved

Combine the sugar, lemon zest, and lemon juice in a small saucepan and cook over very low heat for 10 minutes, until the sugar is dissolved. Add the strawberries and continue to cook over very low heat for 20 minutes, until the strawberries release some of their juices and the mixture boils slowly. Cook until a small amount of the juice gels on a very cold plate. Pour into canning jars and keep refrigerated. Use immediately, or follow proper canning guidelines for longer storage.
Tuesday, May 5, 2009

seven minute frosting


Who doesn't love fluffy white frosting? I am certainly a fan, but I consistently fulfill my cravings with vanilla buttercream. Recently, however, I stumbled across a recipe for Coconut Cupcakes with Seven Minute Frosting on Martha Stewart's website. It looked like a delicious alternative to my old stand-by, and I was quickly inspired to try it out. Though I would have loved to try the coconut cake, I was in a time crunch (and in the mood for chocolate), and, therefore, decided to use Duncan Hines Dark Chocolate Fudge cake mix instead. (While not as dense and intensely chocolatey as I prefer, the cake made from this mix has proven to be reliably tasty and satisfying.)

Twenty minutes and twenty-six right-out-of-the-oven cupcakes later, I began making the frosting. While I received proper warning that the recipe would yield enough frosting for a layer cake plus 12 cupcakes, past experiences of frosting shortages and skimpily decorated cakes filled my mind and clouded my better judgement, and I followed the recipe using its original proportions. Furthermore, I figured that my "better safe than sorry" mentality could only win me some brownie points with my family, who would happily feast on any leftovers. Little did I know that it would take a group of champion eaters to put away the overwhelming amount of remaining frosting.

With the volume generated by the beaten egg whites increasing at least two-fold after the addition of the hot sugar mixture, I ended up with an almost-full Kitchenaid mixer bowl of frosting! Even after piling mountains of the shiny frosting on each cupcake, there was enough left to top at least a dozen more.

Aesthetically, the frosting was a great success; its glossiness made for a nice finished appearance, and its ratio of malleability to stability allowed for a professional-looking swirl.

Otherwise, its reviews were not as high. Simply put, it was marshmallow fluff. Now, it's nothing against marshmallow; I've thrown back my share of jumbo Jet-Puffed mallows right from the bag, and I thoroughly enjoy Mallomars, Peeps, s'mores, Rice Krispies Treats, and even those tiny, dehydrated morsels in hot chocolate mix (if they even qualify as marshmallows). Straight marshmallow fluff on a cupcake, however, was not such a winning combination. While fluff is wonderfully light and sweet, it lacks the creaminess of a traditional frosting, which can better stand up to a cupcake's worth of cake.

Despite these findings, let not this recipe go to waste. Seven Minute Frosting, though homemade marshmallow fluff in disguise, beats commercial Fluff to smithereens. It is smoother, fluffier, undeniably fresher, and sure to make a better-than-ever Fluffernutter sandwich. Or it can be combined with vegetable shortening and confectioners' sugar and used to fill whoopie pies.

Seven Minute Frosting
From marthastewart.com
Makes enough for one 9-inch layer cake and 12 jumbo cupcakes (and she's not kidding!)

1 3/4 cups sugar
2 tablespoons light corn syrup
1/4 cup water
6 large egg whites

In a small heavy saucepan, combine 1 1/2 cups sugar, corn syrup, and water. Heat over medium heat, stirring occasionally, until the sugar has dissolved. Raise heat to boil. Boil, washing down sides of pan with a pastry brush dipped in cold water from time to time to prevent the sugar from crystallizing, until a candy thermometer registers 230 degrees, about 5 minutes.

Meanwhile, in a bowl of an electric mixer fitted with a whisk attachment, whisk the egg whites on medium speed until soft peaks form, about 2 1/2 minutes. Gradually add the remaining 1/4 cup sugar. Remove the syrup from heat when it reaches 230 degrees. With the mixture on medium-low speed, pour the syrup in a steady stream down the side of the bowl containing the egg white mixture.

Beat the frosting until cool, 5 to 10 minutes. The frosting should be thick and shiny. Use immediately.

Saturday, May 2, 2009

pecan tassies


Pecan pie always goes over very well in my house. As a result, I am always looking for spin-off recipes to try. I found a recipe for Pecan Tassies from marthastewart.com, and my family approved, so I started cooking.

These pastries were not only easy but fun to make, as well. The finished product looked super cute, but, unfortunately, its positive qualities end there. I admit that I was concerned about the dough from the start because cream cheese-based doughs tend to be soft and creamy, but I figured that I would give it a shot. After tasting them, I am sad that I didn’t go with my gut and substitute a butter cookie crust, which would have offered a nicer contrast of texture and a much improved flavor. Also, this filling bears practically no resemblance to that of pecan pie, despite its use of similar ingredients. It was excessively sweet, like pure maple syrup, and it did not possess any of the caramel notes of pecan pie.

Needless to say, the search persists for a good recipe for pecan tassies.

Pecan Tassies
From marthastewart.com

For the dough:
1/2 c. pecans
1/2 c. cream cheese
1/2 stick unsalted butter, softened
3/4 c. all-purpose flour
Pinch of salt

For the filling:
1 large egg
1/4 c. packed light-brown sugar
2 tbs. pure maple syrup
2 tsp. pure vanilla extract
1 tbs. unsalted butter, softened
1/4 tsp. salt
3/4 c. pecans, toasted and coarsely chopped

Preheat oven to 350 degrees. Grease a mini muffin pan.

Process pecans in a food processor until finely ground (to make about 1/3 cup). Set aside. Put cream cheese and butter into the bowl of an electric mixture fitted with the paddle attachment. Mix on medium-high speed until well blended. Add flour, ground pecans, and salt. Mix until dough just comes together.

Roll dough into sixteen 1-inch balls, and press into bottoms and up sides of cups of mini muffin tins.

Whisk the eggs, sugar, maple syrup, vanilla, butter, and salt in a small bowl. Stir in pecans. Spoon about 1 1/2 teaspoons filling into each muffin cup.

Bake pecan tassies until crust begins to turn golden, about 15 minutes. Let cool completely in tins on wire rack. Unmold. Pecan tassies can be stored in single layers in airtight containers for up to three days.